Hey everyone, Today we’re pulling back the curtain on an essential element of game development: creating captivating 3D menus in Unreal Engine. Whether you’re a budding game developer or an experienced 3D artist looking to expand your skillset, mastering UI/UX in Unreal Engine 5 is crucial for delivering a truly immersive gaming experience.
Table of Contents
We’re going to break down the process of building a dynamic 3D menu in Unreal Engine with interactive hover effects and seamless transitions, setting the stage for your next big title. Get ready to dive into the world of real-time rendering, game mechanics, and interactive design!
1. Setting the Stage: From Character Spawn to Camera Focus
Before we jump into the exciting part of designing our menu, the first step is to redefine our level’s purpose. Typically, when you start a new project in Unreal Engine, you might spawn as a third-person character. But for a menu, we need a fixed camera view.
- Create a New Folder: Organize your project by creating a dedicated folder, e.g.,
[3D_Menu]. - Game Mode Base: Within this folder, create a
Game Mode Baseblueprint (e.g.,MainMenuGameMode). This tells Unreal Engine to spawn a camera instead of a character. - World Settings Override: In your
World Settings, set theGame Mode Overrideto your newly createdMainMenuGameMode. - Initial Playtest: Play the level to confirm that you now spawn as a camera, not a character. This foundational step is key for any virtual production or interactive application.
2. The Blueprint of Interaction: BP_Menu3D
Our 3D menu needs a central control point. This is where our BP_Menu3D blueprint comes in.
- Create BP_Menu3D: Inside your
[3D_Menu]folder, create a new Blueprint Class and name itBP_Menu3D. - Adding Components:
- Add a Camera Component to
BP_Menu3D(not a Cine Camera). Position it backward from the default scene root. - Add a Widget Component to the default scene root. This will serve as the canvas for our UI.
- Add a Camera Component to
- Compile and Save: Always remember to compile and save your blueprints frequently to apply changes.
3. The Building Blocks: Widgets for Your Menu
Widgets are the visual elements of our menu. We’ll create three essential widgets to bring our menu to life.
- Widgets Folder: Create a new folder
[Widgets]to store your UI assets. - User Widget – Menu3D_Widget:
- Right-click in the
[Widgets]folder, go toUser Interface, and selectWidget Blueprint. Name itMenu3D_Widget. - In the
Graphsection ofMenu3D_Widget, go toClass Settingsand checkGenerate Abstract Class. - Add an Event Dispatcher named
TransitionToLinkedMenu. This is crucial for handling menu transitions, an important aspect of user experience (UX).
- Right-click in the
- User Widget – MainMenu_Widget:
- Create another
Widget BlueprintnamedMainMenu_Widget. - In its
Graphsection, underClass Settings, set itsParent ClasstoMenu3D_Widget. This creates a hierarchy for our menus.
- Create another
- User Widget – Button_Widget:
- Create a final
Widget BlueprintnamedButton_Widget. - Add Button and Text: Drag a
Common ButtonandTextwidget into itsDesignertab. - Text as Variable: Select the text, check
Is Variable, and rename itButtonText. - Styling:
- Set the
Text Colorto a grayish shade. - Make the
Button‘s background color is fully transparent. This allows us to control the hover effects independently.
- Set the
- Dynamic Text: In the
Graphsection, create aTextvariable (type:Text), make itInstance Editable,Blueprint Read Only, andPrivate. Connect aSet Text (Text)node fromButtonTextto this variable, ensuring the button displays dynamic content. This is a key aspect of UI development.
- Create a final
4. Interactive Elements: Hover and Click Functionality

Making our menu interactive is where the magic happens. We’ll add hover effects and click actions to our Button_Widget.
- Hover Events:
- Select the
ButtoninButton_Widget‘s designer. - Under
Events, addOn HoveredandOn Unhoveredevents. - Set Background Color: From the
Buttonreference, drag out, and search forSet Background Color. - Hover Color Variable: Promote the
Colorinput of theSet Background Colornode to a variable namedHoverColor. Set this variable toInstance Editable,Blueprint Read Only, andPrivate. Choose a brownish color for theHoverColor. - For
On Unhovered, set the background color to fully transparent.
- Select the
- Click Event:
- Select the
Buttonand add anOn Clickedevent. - Add an Event Dispatcher named
OnClickand call it in this event.
- Select the
- Compile and Save: Crucial for applying all these interactive elements.
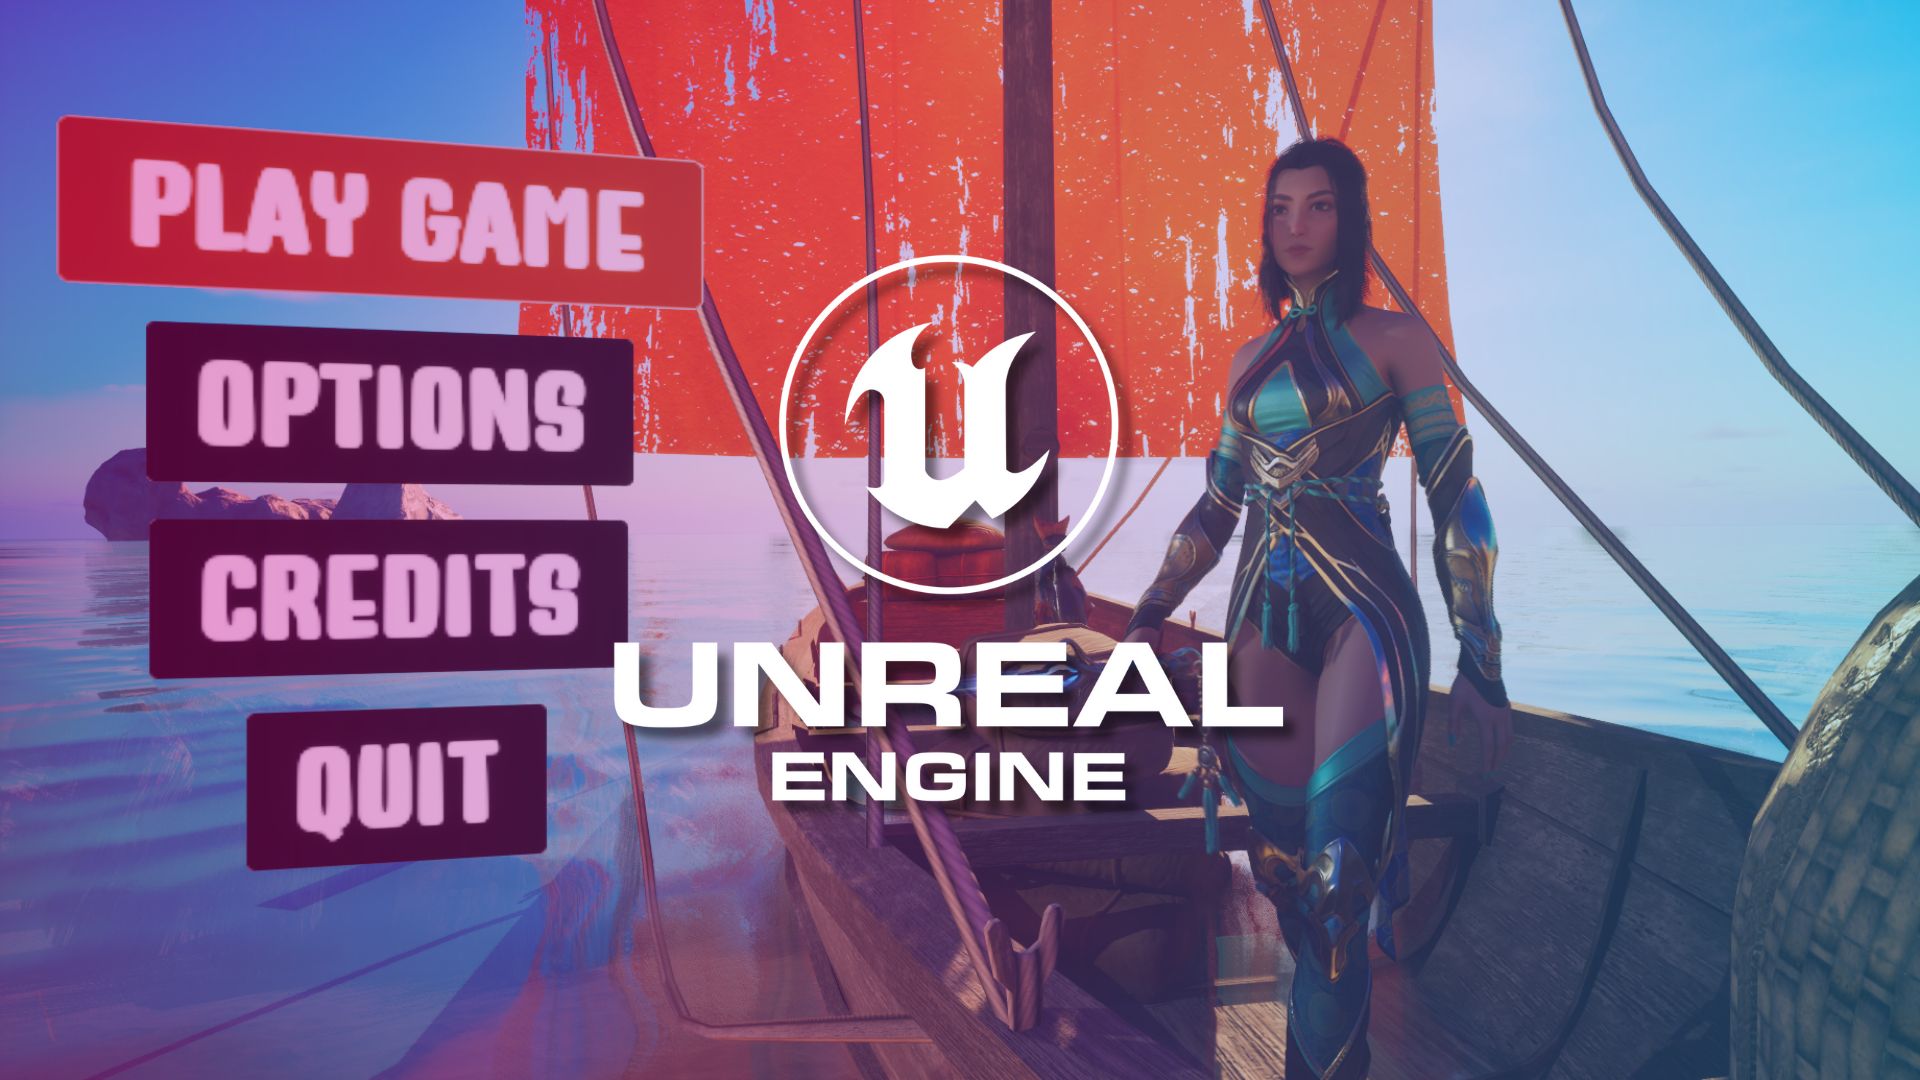
5. Designing Your Main Menu Layout
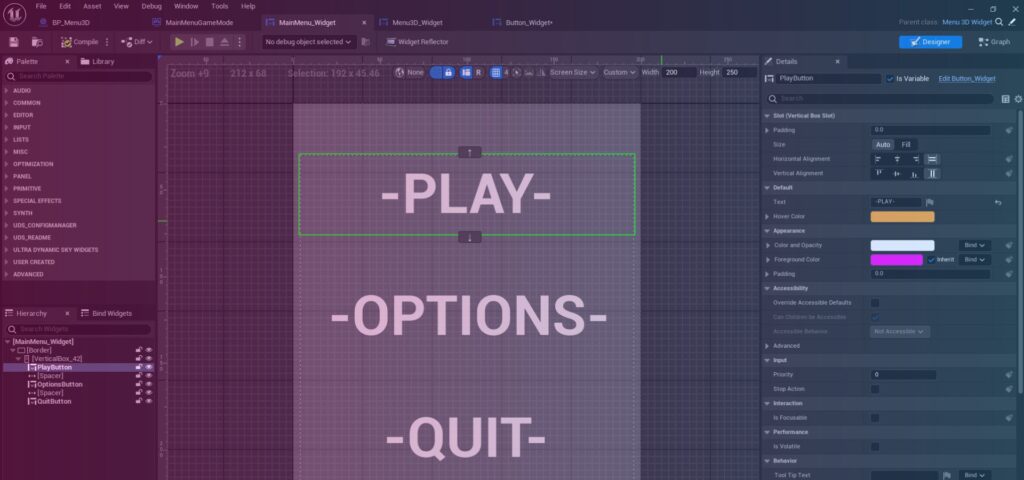
Now, let’s assemble our MainMenu_Widget using the Button_Widget We just created.
- Designer Tab of MainMenu_Widget:
- Add a
Borderand set itsSizetoCustom(e.g., 200×250). - Add a
Vertical Boxinside theBorder. - Add Button Widgets: Drag three
Button_Widgetinstances into theVertical Box.- Rename them to
PlayButton,OptionsButton, andQuitButton. - Set their
Button Textto “PLAY”, “OPTIONS”, and “QUIT” respectively.
- Rename them to
- Spacers: Add
Spacerwidgets between the buttons and set theirY Valueto 25 for visual separation. - Padding: Adjust the
Vertical Box‘sPadding(e.g., 30 at the top) for a better layout.
- Add a
- Transparency: In the
MainMenu_Widget‘sDesignertab, select theBorderand set itsColor and Opacity(alpha) to transparent. This ensures your background environment is visible.
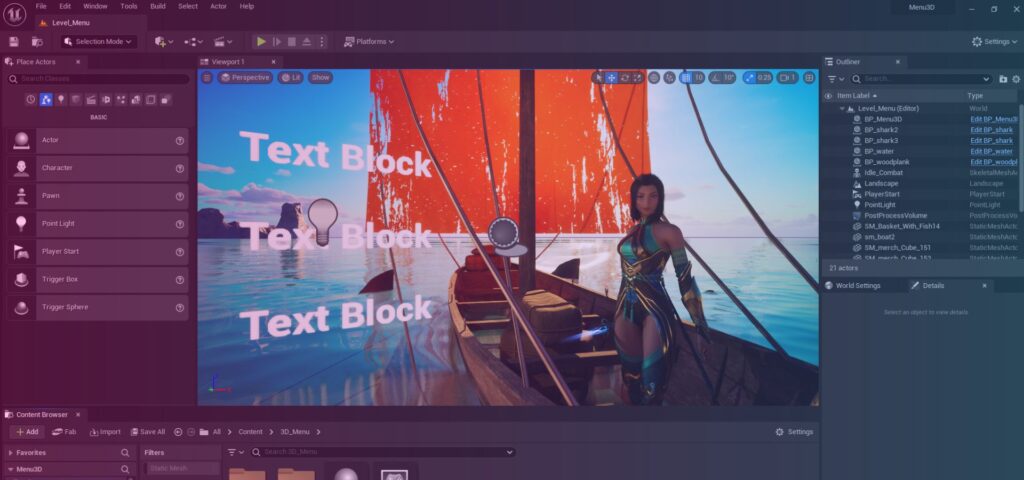
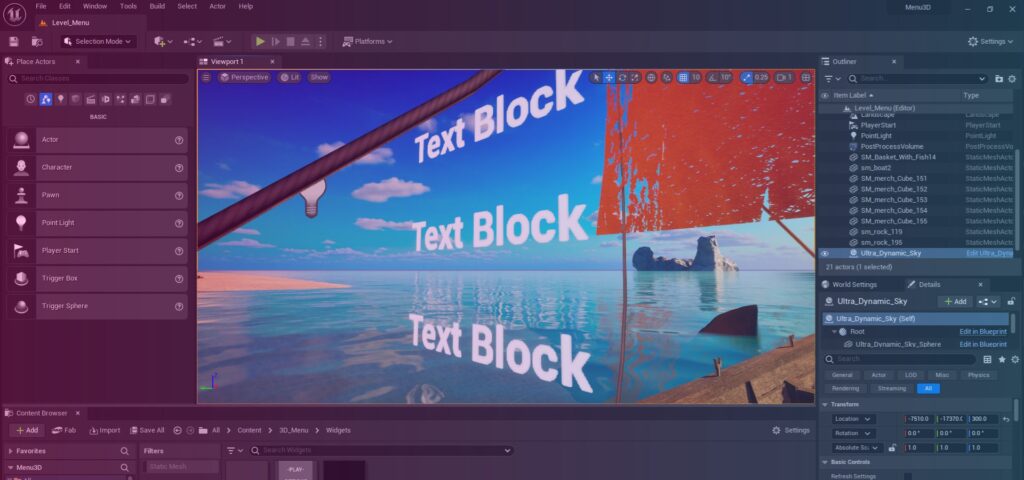
6. Integrating the Menu into Your Level
Bringing the BP_Menu3D into your scene is the next step to visualize your menu.
- Drag BP_Menu3D into Scene: Drag your
BP_Menu3Dblueprint from the[3D_Menu]folder into your level. - Position and Rotate: Position and rotate the
BP_Menu3Dactor in your scene to your desired location and orientation. Consider where your player character will eventually be. - Widget Component Settings: With
BP_Menu3Dselected in theDetailspanel, find theWidgetsection.- Set the
Widthto 200 andHeightto 250 (matching your border size). - Set the
Widget ClasstoMainMenu_Widget.
- Set the
- Flipped Menu Fix: If your menu appears flipped, open
BP_Menu3D, select theWidgetcomponent, and rotate it by -180 or 180 degrees. - Player Start: Ensure you have a
Player Startactor in your scene to define where the camera initially spawns.
7. Enhancing the User Experience: Input, Transitions, and Sound
Now, let’s refine the interaction, add camera transitions, and include satisfying audio feedback.
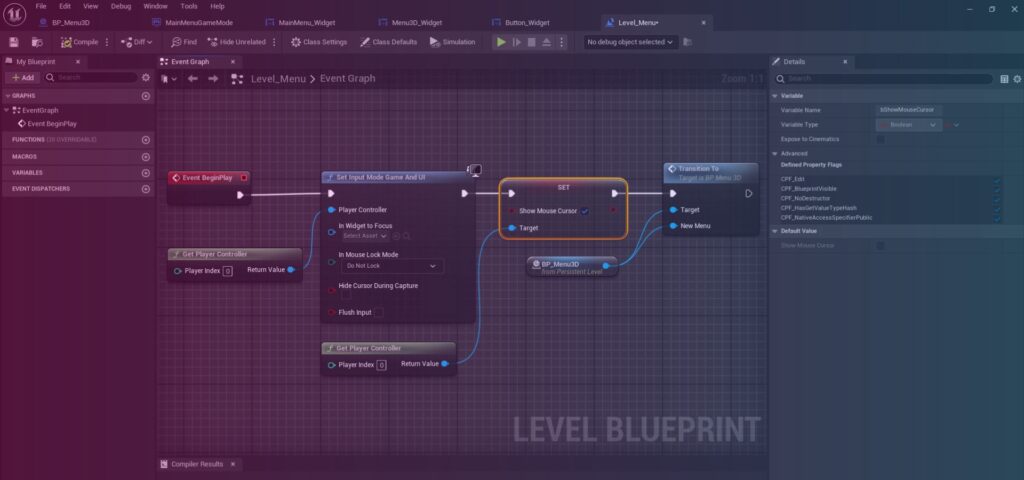
- Level Blueprint – Input Mode and Mouse Cursor:
- Open your
Level Blueprint. - On
Event Begin Play, get thePlayer Controller. - Set
Input Mode Game And UIto enable both game input and UI interaction. - Set
Show Mouse CursortoTrue.
- Open your
- Level Blueprint – BP_Menu3D Reference:
- In the
Level Blueprint, right-click in an empty space and create aReference to BP_Menu3D. - From this reference, call the
TransitionToCustom Event we’ll create next.
- In the
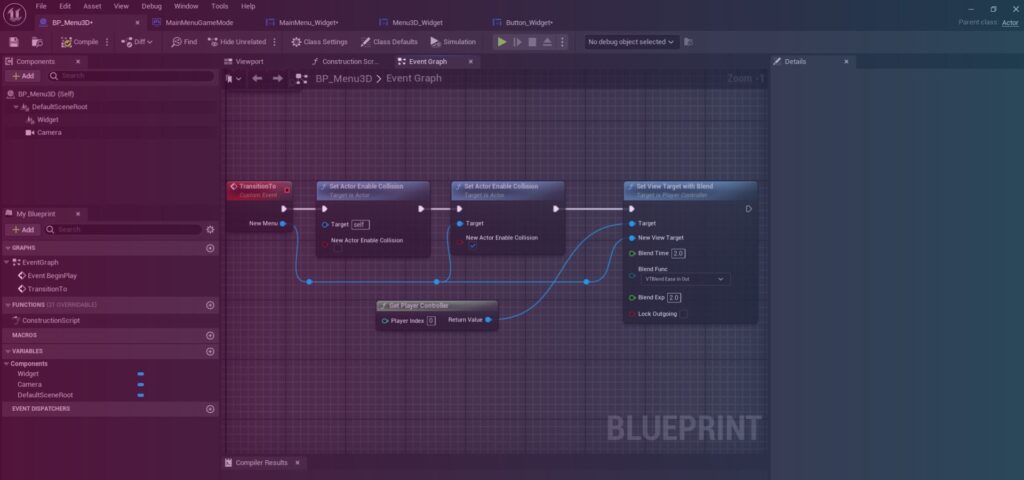
- BP_Menu3D – TransitionTo Custom Event:
- Open
BP_Menu3D. Delete default events. - Add a
Custom EventnamedTransitionTo. - Add
Set Actor Enable Collisionnodes (one checked for true, one unchecked for false) and connect them based on aNewMenuinput (BP_Menu3D object reference). - Get
Player Controllerand useSet View Target with Blend. Connect theBP_Menu3Dreference toNew View Target. SetBlend TimeandBlend Exponent(e.g., 2 seconds each) for a smooth cinematic transition.
- Open
- BP_Menu3D – Receive Hardware Input:
- Select your
BP_Menu3Din the scene. In theDetailspanel, underInteractions, checkReceive Hardware Input.
- Select your
- Main Menu Widget – Cursor Icon:
- Open your
MainMenu_Widget. For eachButton_Widgetwithin it, go toBehavior->Advanced->Cursorand set it toHand. This improves game usability.
- Open your
- Button_Widget – Hover Sound:
- Create a new folder
[Sounds]in your[3D_Menu]directory and import your desired hover sound (e.g.,Hovexp). - Open your
Button_Widget. After theOn Hoveredevent andSet Background Colornode, add aPlay Sound 2Dnode and select yourHovexpsound. This adds crucial audio feedback.
- Create a new folder
Wrapping Up: Functionality and Beyond
Finally, let’s connect our menu buttons to actual game actions.
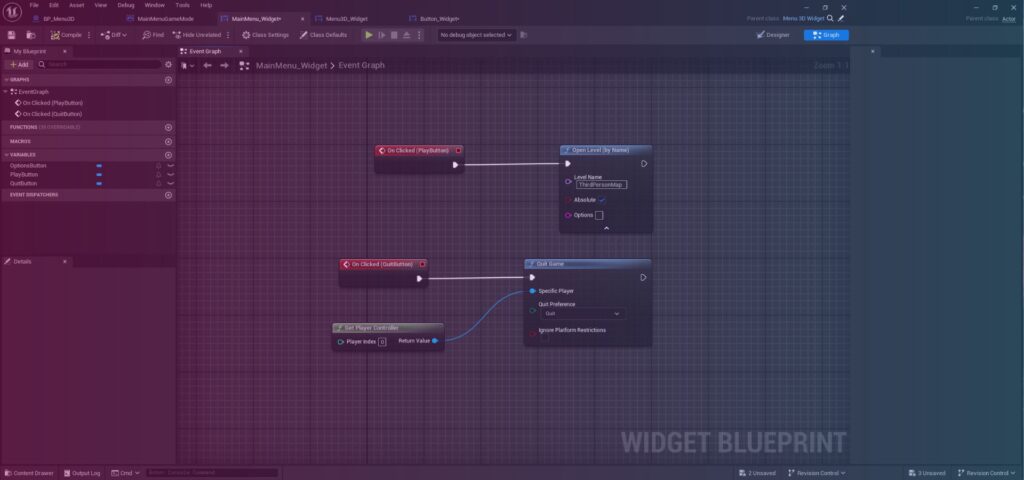
- MainMenu_Widget – Button Actions:
- Open
MainMenu_Widgetand go to itsGraphtab. - For the
PlayButton, add anOn Clickedevent. From this, drag out and search forOpen Level by Name. Paste the name of your desired game level (e.g., “ThirdPersonMap”). This is your entry point into core gameplay. - For the
QuitButton, add anOn Clickedevent. From this, drag out and search forQuit Game. Get thePlayer Controllerand connect it to theSpecific Playerinput.
- Open
- Compile and Save All: Test your menu: hover effects, sounds, and button functionality.
This robust 3D menu is just the beginning! If you’re passionate about game development, virtual reality (VR), or creating incredible interactive experiences with Unreal Engine, then you’ll want to dive deeper. Our comprehensive course on knowledge.vorldbox.com goes beyond the basics, covering advanced menu creation, intricate game mechanics, and the full game development pipeline in Unreal Engine 5.
Don’t miss out on unlocking your full potential. Like, subscribe, and hit that bell icon for more Unreal Engine tips and tutorials! See you in the next one!


